Jump to content

Theme© by Fisana
 

Photo
- - - - -

bachamn's Custom Casting Endeavors


  • Please log in to reply
9 replies to this topic

#1 bachamn

bachamn

    ビーストフォーマー オタク

  • Beastformers Archaeology
  • 3561 posts
  • Gender:Male
  • Location:Arizona, USA
  • Interests:Digital Media, Travel, LRGs
    ビーストフォーマー
    レーザービースト
    ビーストサーガ

Posted 14 May 2014 - 06:46 AM

Some of you know that I've been toying around with the idea of getting into the casting game myself. I'm not looking at doing any custom sculpts at the moment but making mono reproductions sounded pretty fun so I thought I'd give it a whirl. I bought some resin casting supplies from Hobby Lobby some months ago and finally got around to trying it out this past weekend. If I take to the craft I'll eventually move on to rubber but for now resin it is.


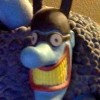
I decided to try something simple for my first attempt, so I went with one of my Spirited Away phone-strap figures as they're roughly 1" and quite well detailed. Yesterday I pulled my first cast :)


custom_ushioni1.jpg


For my first attempt, I'm pretty satisfied with the results. I'd intended him to be trans-blue (and he is, kind of) but learned the dye is much stronger than I had anticipated and turned it pretty much black. So it's a bit hard to take detail photos of him (especially on my phone, at work) but you get the idea.


I didn't have too much of an issue with bubbles, and I know not everyone here who casts works with resin, but assuming you've had some experience with it what's the best way to deal with bubbles once in the mold? I pre-coated the mold with a thin layer as is recommended by the casting kit instructions (which is why the horns and most extremities are clear and not blue, decided to make him colored later  ;) ), and still got some small bubbles which I tried extracting with a toothpick but you can see some tiny ones remained in the horns.  


I have another one of these guys curing at the moment, only this time I used much less dye so the second one should be a sea-glass bluish green.


Edited by bachamn, 20 May 2014 - 04:10 PM.

  • 2


#2 ironmask

ironmask

    LRG Lifer

  • Members
  • PipPipPipPipPipPipPipPip
  • 10723 posts
  • Gender:Male

Posted 14 May 2014 - 07:28 AM

If you're not dealing with a pressure pot or vacuum chamber, you can vibrate the mold to help coax air bubbles out of the casting.


***EDT***

I should probably mention, that you can achieve this most simply by tapping the sides of the mold.


Edited by ironmask, 14 May 2014 - 07:29 AM.

  • 0

#3 plasticfiend

plasticfiend

    Balloon SPECIALIST!

  • Members
  • PipPipPipPipPipPip
  • 3067 posts
  • Gender:Male
  • Interests:BALLOONS - MUSCLES - COMICS - NINTENDO - TOYS in general...

Posted 14 May 2014 - 08:40 AM

I've been "toying around" (pun intended) with the idea of dabbling in casting myself over the last few weeks. I've been looking at some of Ericnilla's stuff and watching a bunch of youtube videos and getting really inspired. However, I know that it will probably be one of those things that I WANT to do, but won't get around to doing. I just don't have a place really to set up shop and make a mess! Or the time for that matter... But I'm hoping one day I will. I've got some pretty cool ideas. BUT FIRST I've got some custom balloon heads I'm working on...

In the meantime, I think these are a GREAT first attempt Bachamn!

I'm a complete novice - but one of the videos I saw talked about what ironmask was saying and just tapping on the sides of the mold to work out the bubbles. Can't wait to see your next piece!

PF!
  • 0

Feel free to take a look at our FB and Instagram pages... for an example of out balloon work!!

Also, we are trying to get our FB page to 500 likes by the end of OCT 2014, if you like our designs, please help us out! Thanks! And ANY LRGers - feel free to make a balloon REQUEST and we will see what we can post on your behalf!


www.MadCapBalloons.com

www.facebook.com/MadCapBalloons

www.instagram.com/MadCapBalloons


#4 bachamn

bachamn

    ビーストフォーマー オタク

  • Beastformers Archaeology
  • 3561 posts
  • Gender:Male
  • Location:Arizona, USA
  • Interests:Digital Media, Travel, LRGs
    ビーストフォーマー
    レーザービースト
    ビーストサーガ

Posted 15 May 2014 - 06:44 PM

Second pull, little closer to the color I was going for the first time ;)


custom_ushioni2.jpg


I tried tapping on the sides to remove bubbles, even used a neck massager on the side but no matter how long I sit and watch the tiny bubbles pop it seems there are always more microscopic ones visible inside. I don't think it looks bad but I'm wondering if it's possible to get rid of all the bubbles or just the major ones?


Also, any suggestions for casting boxes (or whatever you call the frame that goes around the silicon when making a mold)


I used LEGO but it wasn't really ideal as some leaked between the bricks, and it was kind of time consuming to build/disassemble. 


Thanks in advance for advice :)


Edited by bachamn, 16 May 2014 - 12:55 PM.

  • 2

#5 ironmask

ironmask

    LRG Lifer

  • Members
  • PipPipPipPipPipPipPipPip
  • 10723 posts
  • Gender:Male

Posted 16 May 2014 - 07:05 AM

For cylinder shaped figures, like that one, you could probably get away with a cup mold. 

As for the tiny, tiny air bubbles... Without a pressure pot, in my experience, that's pretty much what you're going to get.


I should add, that it doesn't look bad, at all!


  • 0

#6 bachamn

bachamn

    ビーストフォーマー オタク

  • Beastformers Archaeology
  • 3561 posts
  • Gender:Male
  • Location:Arizona, USA
  • Interests:Digital Media, Travel, LRGs
    ビーストフォーマー
    レーザービースト
    ビーストサーガ

Posted 20 May 2014 - 04:24 PM

I decided to tackle a new project over the weekend; I have a small collection of antique netsuke that I'm trying desperately not to get too involved in (I thought LRGs were expensive, damnit Japan!)


So here's the result of my first netsuke casting, a 2.5"  Edo era boxwood Tanuki from ~1850.


custom_netsuke-tanuki01.jpg


custom_netsuke-tanuki02.jpg


custom_netsuke-tanuki03.jpg


custom_netsuke-tanuki04.jpg


Obviously I'm still fighting with air bubbles, but I think they might have been more numerous this time around because I spent more time mixing color dyes into the resin (I read after pouring this one that I should have been mixing dye before adding the catalyst. I'm sure that has something to do with it...)


I also learned why it's important to mark the intended location for scoring/cutting open the mold. I didn't do that here, and ended up cutting riiiiight down the front of the figure. Just my luck, but fortunately I was able to eliminate most traces of the flash marks 


I also skipped the initial mold-coating to fill in air pockets, just to see if it was necessary since it essentially means mixing and throwing out some resin each time. The missing spaces around the edges of the tanuki's hat tell me that yes, this isn't a step that I can skip. ;)


  • 1

#7 Ericnilla

Ericnilla

    Y/S*N*T

  • Members
  • PipPipPipPipPipPipPip
  • 9150 posts
  • Gender:Not Telling

Posted 20 May 2014 - 04:56 PM

Very nice for your first moldings. But if you can't use a pressure pot or vacuum chamber there really isn't a way to rid your castings of all the bubbles, no matter how much you vibrate.
  • 0

#8 bachamn

bachamn

    ビーストフォーマー オタク

  • Beastformers Archaeology
  • 3561 posts
  • Gender:Male
  • Location:Arizona, USA
  • Interests:Digital Media, Travel, LRGs
    ビーストフォーマー
    レーザービースト
    ビーストサーガ

Posted 21 May 2014 - 06:37 AM

Yeah I've kind of come to accept that, I was mostly just pointing out that I think I ended up with more bubbles this time than with the previous attempts because I was mixing in dyes at the incorrect time. 


It's looking likely that I'll end up going that route, so I know I need a compressor and pressure pot. Anything else?


  • 0

#9 bachamn

bachamn

    ビーストフォーマー オタク

  • Beastformers Archaeology
  • 3561 posts
  • Gender:Male
  • Location:Arizona, USA
  • Interests:Digital Media, Travel, LRGs
    ビーストフォーマー
    レーザービースト
    ビーストサーガ

Posted 05 June 2014 - 08:20 PM

Made some new molds and cast up a round in a nice fiery orange. Still learning the finer points of mold making and casting, but so far this has been a fun experience :thumbsup:


custom_ghibli-orange-02.jpg  

Radish Spirit (new)


Radish_spirit.jpg


custom_ghibli-orange-01.jpg

Ushioni and Radish Spirit


1000px-Ushi.png


custom_ghibli-orange-03.jpg

Yubaba Statue (new)


Wikia-Visualization-Main%2Cspiritedaway.


custom_ghibli-orange-04.jpg

Practically zero bubbles! 


custom_ghibli-orange-05.jpg

All of my pulls so far, including an orange tanuki!


Edited by bachamn, 05 June 2014 - 08:22 PM.

  • 0

#10 AzraelDarknut

AzraelDarknut

    Budding Collector

  • Members
  • PipPip
  • 84 posts
  • Gender:Male
  • Location:Ohio
  • Interests:Customizing various LRG's, Kaiju and action figures. Also, collecting various toylines (Kamen Rider, Super Sentai, Kinnikuman, etc.)

Posted 06 June 2014 - 02:08 PM

Very nice! Did you do these with a pressure pot or did you figure out another way?


  • 0

My Instagram (where I sell various Power Rangers items and showcase my customs): @azraeldarknut


My Customs Thread


Ask about commissions!


Copyright © 2024 LittleRubberGuys.com