Custom 1:12th M.U.S.C.L.E. Wrestling Ring
#1
Posted 22 April 2011 - 09:47 AM
Here's the original:
And here's my 1:12th custom:
I wanted to incorporate the decal from the original ring:
so I created an updated version of it for two sides of the ring skirt:
I didn't want to include all of the wrestlers pictured on the original because they would end up really small or have to be layed on top of one another in order to fit.
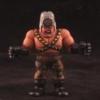
I wanted to incorporate logos for the Thug Busters and Cosmic Crunchers somewhere, so I used the extra space above the illustrations. The Thug Busters logo is recreated from the logo on the M.U.S.C.L.E. 28-Pack, and the Cosmic Crunchers logo was created by me using a freeware font. I also illustrated Buffaloman (Terri-Bull) with one of his horns broken off to reflect his look on the 28-Pack:
Below are more pics:
Close-up of the logo ring skirt:
Close-up of both ring skirts:
Close-up of the King Muscle logo:
Close-up of the ring mat logo:
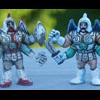
Here's a size comparison with other 6" scaled figures:
Kinniku Buster!
Tower Bridge!
Reference pics were taken from:
The University of M.U.S.C.L.E.
Nathan's M.U.S.C.L.E. Blog
#3
Posted 22 April 2011 - 10:25 AM
#4
Posted 22 April 2011 - 10:30 AM
#5
Posted 22 April 2011 - 10:37 AM
By far, the coolest custom ring I have ever seen!
Yup
#6
Posted 22 April 2011 - 10:41 AM
#7
Posted 22 April 2011 - 11:02 AM
#9
Posted 22 April 2011 - 11:25 AM
PM sent.I want that Thug Buster vs The Cosmic Crunchers Logo on a T Shirt and Bumper sticker....
#10
Posted 22 April 2011 - 11:54 AM
#12
Posted 22 April 2011 - 02:27 PM
#14
Posted 22 April 2011 - 02:53 PM
Want a window into my demented mind? toys, movies, cool stuff around the world @ http://cthuluconnect.blogspot.com/
DMT= insert universe into cannon, aim at brain, fire.
ユデッã‚ー - Yudekkii are you one? サタンクãƒã‚¹ æ°¸é ã«!(satan cross forever!)
é¢ç™½ã„!
#15
Posted 22 April 2011 - 03:25 PM
#16
Posted 22 April 2011 - 07:58 PM
Edited by Dabeavis, 22 April 2011 - 07:59 PM.
Watching old anime as if it's in style, since whatever is trending nowadays just wouldn't suit me at all.
#17
Posted 23 April 2011 - 06:59 AM
Unfortunately no. Not only is it very time intensive on my end, but I really wouldn't feel comfortable charging for something that's copyrighted by Mattel, Bandai, and probably still Toei/Yudetamago in there somewhere. I know people sell these sorts of things online, but since there are copyrighted logos and characters, I'd rather not.Do you have any intention to make some for sale?
I CAN however, post full size, high resolution JPEGs of the decals and post a tutorial on how I did it. You guys would just have to go to a print shop and get your labels printed on sticker stock, buy a ring, paint it, then apply the decals.
This is going to be a bit of a busy weekend for me, so give me some time and I can get that posted.
#18
Posted 23 April 2011 - 07:50 AM
Wow, I wasn't quite expecting this level of response! I'm glad you all liked it so much.
Unfortunately no. Not only is it very time intensive on my end, but I really wouldn't feel comfortable charging for something that's copyrighted by Mattel, Bandai, and probably still Toei/Yudetamago in there somewhere. I know people sell these sorts of things online, but since there are copyrighted logos and characters, I'd rather not.
I CAN however, post full size, high resolution JPEGs of the decals and post a tutorial on how I did it. You guys would just have to go to a print shop and get your labels printed on sticker stock, buy a ring, paint it, then apply the decals.
This is going to be a bit of a busy weekend for me, so give me some time and I can get that posted.
Dang, that is a very cool ring.
#19
Posted 23 April 2011 - 08:46 AM
Would love to have some labels, I am down!!!
Edited by Clawfreak, 23 April 2011 - 08:48 AM.
#20
Posted 23 April 2011 - 09:29 AM
not that it is discounted. We as consumers are conditioned to think"On Sale"means it's cheaper.
#21
Posted 23 April 2011 - 11:18 AM
Very cool overall man.
#22
Posted 23 April 2011 - 05:18 PM
http://www.littlerubberguys.com/forums/index.php?showtopic=69686&pid=351254&st=0&#entry351254
#23
Posted 23 April 2011 - 06:31 PM
Dang, but if you make one is that not sort of copyrighting already?
the only Idea I have that's less copyright offensive is simply the Pre-painted ring, but the ring itself is Mattel
Watching old anime as if it's in style, since whatever is trending nowadays just wouldn't suit me at all.
#24 Guest_General Veers_*
Posted 25 April 2011 - 06:47 AM
#25
Posted 26 April 2011 - 10:24 PM
Below is the tutorial I promised. I don’t think I’ve left anything out, but if something is not clear or confusing, just let me know and I’ll do my best to clarify.
The ring I customized is the Mattel WWE Raw Superstar Ring:
There are several versions of the Superstar Ring on sale, but I went with this version because it has white ropes.
Step 1: Disassemble the ring base
The ring comes mostly disassembled, so just put the posts and turnbuckles aside for now. The base of the ring is actually two pieces, the black frame that has the ring skirts and the holes for the posts, and then the gray “spring action†mat. I removed the gray mat for painting, and I’d recommend you do so as well.
To disassemble the base of the ring, turn it upside down and you should see four plastic wells that each have a screw at the bottom. Remove each screw with a standard size Phillips head screwdriver. When you remove each screw, a short, black plastic tube with a larger rounded top should fall out of the hole.
Once all four screws and plastic tubes are removed, flip the ring back over to the top. The Gray mat has two short plastic tabs on each side of the mat (eight in total) that connect into the base of the ring. When you depress the mat, you should see the two holes in the base of the ring where the tabs connect. Carefully bend one side of the mat inwards, away from the base and the tabs should pop out. Repeat this for each side, and then the mat will come off.
Underneath are four springs which four plastic tubes on the underside of the gray mat slide inside of. There’s also a slight recess in the black ring base where the springs sit. Take note of this for when it comes time to reassemble.
Place your four screws, four plastic tubes, and four springs somewhere they won’t get lost, because you most likely won’t be reassembling the ring until a day or so later. I just put them in a sandwich bag.
Step 2: Paint the ring base
Now that you’ve removed the gray mat, it’s time to paint the base of the ring. I used Krylon Fusion For Plastic spray paint which is designed to adhere to plastic without priming. To my knowledge, they only sell one shade of yellow in the Krylon Fusion brand, so there shouldn’t be any confusion as to which shade to buy at this point.
Apply an even coat of paint and then let it dry for around fifteen minutes, and then apply another coat. It will take several coats to get the yellow completely opaque over the black, so repeat this until you’ve got an even yellow color on all four sides.
If you have any paint left, you can paint the underside as well. The treads for the screws are actually a part of the gray mat, so you don’t need to worry about filling them with paint on accident.
Once you’re finished painting, I’d give the ring a full twenty-four hours to dry. The directions on the back of the Krylon Fusion can claims that it will dry to the touch in an hour, but I found this to only be marginally true. Or course I was also painting outdoors in humid weather, so drying time may vary.
Spray painting was quickest for me, but if you’d like to paint it another way, feel free. Just be sure the paint you use adheres well to plastic.
Step 3: Paint the ring posts
The Raw Superstar Ring has four posts, but one of them has the ropes attached. This is nice because the ropes are already pre-tightened and there’s no ugly knot, but on the downside the ropes get in your way when you paint one of the posts. The other three don’t have any obstructions however, and are easy to paint.
I used Sharpie brand paint pens for the posts. The specific items are called Sharpie Paint – Bold Point – Red and Blue.
They’re the largest size and have the greatest area of coverage, but the tip is cut at an angle to give you a bit of a point for making finer strokes as well. This is especially helpful for painting around the post with the ropes.
This step is pretty self-explanatory, just paint two posts blue and two posts red. I didn’t use any sort of primer, but I did have to apply several coats to each. Paint the post with the ropes in sections so the ropes don’t sit against wet paint while it dries. If you do get some paint on the ropes, just rub a little bit of white model paint over it and you won’t really notice.
This step took me several days to complete, so take your time. Apply a coat, wait several hours, and then repeat.
Once the ring base has finished drying, I applied the same paint colors to the outer wells where the poles plug in. On an actual wrestling ring, the pole would extend all the way to the floor, so I painted this part of the ring base to help give some illusion of that.
Step 4: Reassemble the ring
By now the base of the ring should be completely dry and you can re-attach the gray mat. You’re just going to go backwards through step one.
1. Slide the springs over the posts on the gray mat.
2. Insert the eight tabs (two on each side) into the holes on the inner sides of the ring, while also being sure that each of the springs is lined-up with the four holes on the ring base. Once the mat is snapped back into place, depress the mat and be sure all four springs feel like they’re in place correctly. If not, remove the mat and realign them.
3. Insert the four black plastic tubes into each of the four wells.
4. Insert the four screws.
Step 5: Print and apply the decals
If you have access to a large enough printer, then simply invest in some nice sticker stock and print them. If not, find a local print shop. You can probably use Kinko’s, but I’ve always found them to suck, so I’d try to find somewhere better if you can. In the past I’ve had issues with Kinko’s refusing to print anything copyrighted, but hopefully whoever’s behind the counter won’t have any idea what M.U.S.C.L.E. is.
The JPEGs of the ring skirts each have crop marks and a bleed. For those that don’t know what that means, the crop marks tell you where to cut and the bleed is there so that you won’t get a thin line of white on the edge when you cut them out. I used a metal ruler with cork backing and ran an x-acto knife across the edge to trim them out straight. Just watch your fingers!
You’ll need to print two of each label, but I’d print several in case you mess up cutting or applying the decals. When you apply the decals to the ring skirt, be sure to go from left to right (short ends) instead of top to bottom (long ends). Because of the folds in the plastic to simulate cloth, the decal can get bad creases and air pockets if you try to go from top to bottom. I angled the decal upwards, away from the bottom a little bit, as the decal tended to make a bit of an arch as it went across the plastic folds. I’m sure you’ll see what I mean when you try it for the first time.
Also, as I’m sure you’d noticed by now, one of the sides of the ring has a small indention on the bottom of the ring skirt. I don’t know what its function is, but I made that side the “back,†as in the side you’re not seeing in my original pictures. I applied the decal to that side and then made two small cuts with my x-acto knife and folded that section of the decal under. I’d recommend following my lead and putting one of the “M.U.S.C.L.E.†logo decals there as there is enough empty space along the bottom that it won’t cut into the main image.
The decal for the middle of the ring mat is a bit harder to cut. There’s a dark gray line around the outside of the circle to use as a guide of where to cut. I just carefully cut around the circle by hand, but if you’re good with a circle cutter or have something of comparable size to trace around while you cut, go for it.
Decals below:
M.U.S.C.L.E. Ring Skirt “Front and Backâ€:
TB vs. CC Ring Skirt “Red side and blue sideâ€:
Ring Mat Logo:
Step 6: Insert the posts and ropes
This is self-explanatory as well. Just plug the poles into the four corners, taking note that your reds are on one side and your blues on the other. Loop the ropes into each corner post and you’re all done!
Let the war between the Thug Busters and the Cosmic Crunchers begin!
Edited by Mainman, 27 April 2011 - 11:16 AM.